Sunday, December 27, 2009

Christmas Day

Okay, I know. I'm terrible. I haven't posted in forever. I have a good excuse, though - it's impossible to take pictures of my manis in natural light when I'm at work during all daylight hours!

I did manage to snag a picture of my Christmas Day manicure, though, and I was quite excited about it. Here it is, in all it's ridiculous glory (as always, click for larger images):

Photobucket

Photobucket
China Glaze Emerald Sparkle, Ruby Pumps, and Millenium
Konad Plate M63


Fun, no? We were doing a super casual Christmas celebration with friends, and everyone got a kick out of the themed manicure. I got the idea from Temptalia, but added the silver just for a bit of extra kapow.

Today, however, I was ready to move on. And since I have other untrieds in China Glaze's Wizard of Ooh Ahz collection, I decided to go with Dorothy Who?
Photobucket
China Glaze Calypso Blue with Dorothy Who?

You have GOT to view the larger version of that one. It's gorgeous! Dorothy Who? was leaving me with VNL even after several coats, so I layered another favorite blue (Calypso Blue) underneath it. I am completely in love with the result!

Next up: What to do for a New Year's Eve mani?? Ack, so many choices!

Wednesday, October 28, 2009

I'm in New Orleans!

After years of wanting to visit New Orleans, I'm finally here! Will be gone until Sunday, so no new posts until at least then. Sorry!

Saturday, October 24, 2009

A Failed Attempt

I tried Zoya Freja for the first time and adored it. My goal was to do a subtle design on top of it that wouldn't distract from it too badly. Unfortunately, I went too subtle and you can barely even see the design.


Photobucket
Zoya Freja, China Glaze Joy, Plate M60


I love that design, it definitely ranks as one of my favorites. However, China Glaze Emotion or Poetic would have been a better choice than Joy for the design. Oh well, I'll know for next time!

Friday, October 23, 2009

Trying something new

I decided to try something new here. My goal was for it too look like the fairy was floating on a field of flowers. I'm not quite sure how I feel about the outcome.


Photobucket
Orly Goth, China Glaze Awaken, China Glaze OMG, Plate M35


What are your thoughts?

Wednesday, October 21, 2009

Winter Nail Art Contest!

Just passing this on in case anyone wants to enter. Doubt I'll do it, since my nail art abilities are pretty limited.

http://nailartworld.blogspot.com/2009/10/winter-nail-art-contest.html

I'm kind of motivated to try a winter mani tonight now, though. Will probably waste a lot of brain power today pondering how to paint my nails instead of focusing on work like I should, but it's hardly like that's a first!

Tuesday, October 20, 2009

What Was I Thinking?

I'm starting a new category called, "What Was I Thinking?"

The drunken konadicure from a few weeks ago definitely deserves this label, as does this one:


Photobucket
Wet 'n Wild Rustic, Konad Special Polish in Black, Plate M57


I was hanging out with some friends, and I let one of them pick my mani. This was the result.

It's not that it's hideously ugly, but it's definitely fairly tacky. I think the base color is so pretty that overall it winds up being forgivable. My friend's fiance said it reminded him of a prostitute, though, which I think kind of says it all!

Monday, October 19, 2009

A Tale of Three Konadicures

This time I decided to forgo poetry and go with honesty. :0P

I think I've mentioned this before, but I specifically bought plate M74 because of how much I loved one of the designs.

However, I've had a lot of trouble getting it to work for me.

Here is attempt number one. Clearly it needs two polishes that contrast more than these two do.


China Glaze,Calypso Blue,Adore,Konad,M74
China Glaze Calypso Blue, China Glaze Adore, Plate M74


Attempt number two was just boring as hell. I hated this color combo, even though separately both of these colors are gorgeous. Also, I had thought that flipping the design on the ring finger would be cool looking, and in theory it probably would be... but in practice I hated it. Finally, I decided that I don't like a metallic finish with this design. Creme polishes only with this one from now on.


Photobucket
Orly Prince Charming, China Glaze Magical, Plate M74


So, with those lessons learned under my belt, I went a different direction the next time around. This is what I'm wearing right now:


Photobucket
Orly Poison Apple, Konad Special Polish in Black, Plate M74


I also love the reverse double stamp that I did on the thumb:


Photobucket


Cute, no?

Sunday, October 18, 2009

A Tale of Two Konadicures

I guess this is actually a tale of three konadicures, but that would be far less poetic, no?

The design in question is the checkered pattern on plate M64.

The first time I tried using it was a disaster. Alignment was completely off. I wound up removing it right away.


Photobucket
China Glaze Magical, Orly Country Club Khaki, Plate M64


Second try was a bit better, but Color Club Revvvolution wasn't the best choice here. I should have gone for something with better contrast. Alignment is still pretty awful, though, and I smudged the heck out of the design on my ring finger.


Photobucket
Zoya Pinta, Color Club Revvvolution, Plate M64


Finally, the other day, I did this. Have to say, I kinda loved it.


Photobucket
China Glaze Let's Do It In 3-D, Konad Special Polish in Black, Plate M64


I got compliments everywhere I went all week. It was pretty awesome. :0)

Saturday, October 17, 2009

The Matte Trend

I'm not really feeling the matte trend. I tried one matte konadicure and wasn't really in love with it. Here it is:


Essie Angora Cardi with China Glaze Awaken, konad plate M64
Essie Angora Cardi, China Glaze Awaken, Plate M64


Yeah... not really my thing. What can I say. I dig shine.

Friday, October 16, 2009

More Flowers...

This is another of my favorite images. Strangely, this is the only picture I have of it. I'll be trying to remedy that over the weekend, for sure.


China Glaze,Calypso Blue,Adore,Konad,M74
China Glaze Calypso Blue, China Glaze Adore, Plate M74

Thursday, October 15, 2009

Ooooh, flowers...

I love flowers. Stands to reason, since this used to be a gardening blog. The images with floral prints are always my favorites.

This manicure was one of my more "out there" ones. It didn't stay on for long, I'm afraid. It was just a little too much for me. Next time I'll use tones that don't contrast quite as much.


China Glaze,Bermuda Breakaway,Konad,Light Green Special Polish,M73
China Glaze Bermuda Breakaway, Konad Special Polish in Pastel Green, Plate M73


Isn't the floral design so pretty and delicate, though? I just adore it.

Wednesday, October 14, 2009

Another one with smaller images

There is a certain floral image on plate M24 that fascinates me. Here are two manicures that I've done using it:


Photobucket
Essie Chinchilly, Konad Black Special Polish, Plate M24

Sephora by OPI,Metro Chic,Orly Country Club Khaki,Konad,M51
Sephora by OPI Metro Chic, Orly Country Club Khaki, Plate M24


I don't know what it is about this one image that I keep coming back to, but I'm always tempted to try something new with it.

Tuesday, October 13, 2009

The Smaller Images

There are a lot of smaller designs that can be used. In general, I don't like them. A little flower or star or whatever can be cute, but I greatly prefer the full nail or french tip designs.

Once - just once - I did a manicure using the smaller images that I really liked, and only because I layered the images using several different colors of nail polish. It was a royal PITA, but I loved the outcome.


Photobucket
Photobucket


That's China Glaze DV8 with Calypso Blue and Midnight Ride over it. The designs are both from plate M51.

I really should do stuff like that more often.

Monday, October 12, 2009

A First Time For Everything

I have a lot of images that I've never used. This was one of them:


Photobucket
Zoya Pinta, China Glaze Awaken, PlateM74


I've had plate M74 for a while and love the other images on it, but for whatever reason had never gotten around to using this particular one. Now that I have, I can't figure out why I waited so long!

Saturday, October 10, 2009

Friends Don't Let Friends...

Sometimes when I choose to stay in for a night I'll indulge in a few glasses of wine. Drinking, as we know, can often influence one's decision-making skills. Thus, I've several times wound up polishing my nails in a way that makes me shake my head in disbelief once I've sobered up.

Here is just one example:


Photobucket


Yeah. Uhhh... right. Not my finest hour.

I'm not entirely sure what the base color is, although odds are good that it's China Glaze Sexagon, since that was in my unused pile for a while and I'm doing my best to work my way through that stash. The design is Konad special polish in black, using plate M57.

There you go, kids. The lesson learned? Don't drink and konad.

Thursday, October 8, 2009

Signature Colors

I think most women have a comfort zone when it comes to their nail polish. It's rather like having a signature scent. Once you find something you like, it's really hard to break free of that color family.

For me, that's always meant blacks, grays, and dark "almost black" colors.


Here's an example of a manicure that I absolutely adored. It's rather predictable - blacks and grays, the same as most of the manicures I love on myself. (Yes, of course, you can click for a larger image. Thank you for asking.)

OPI Baby It's Coal Outside, China Glaze OMG, Konad plate M70

Once in a while I'll do something radically different and will be shocked by how much I like it... and this next manicure is an example of that. I did it sometime mid-summer, when I had gotten it in my head that I wanted to do a manicure that reminded me of the beach while I suffered through being trapped in my office building all day every day.

Essie Sag Harbor with Orly Country Club Khaki, konad plate M64

This wound up being one of my favorite manicures of all time. I received more compliments on this manicure than any other I'd ever done. Additionally, it satisfied my need for "beachy" colors. I sighed with happiness whenever I looked at my hands.

Often, in fact, when I try a new color I'll hate it on myself at first. Generally I paint my nails at night, and there have been many times when I'll wind up doing my nails twice in a night or going to bed with a manicure I don't like very much. However, sometimes a new color will grow on me. I'll just need to get used to it a little bit before I'm able to view it objectively, and that will usually take a day or so to happen. My favorite colors are now ones that I hated when I first applied them!

The moral of the story is that we should have fun with our nail polish colors instead of limiting ourselves. If there is one color that you can't seem to break yourself away from (like me and black/gray), try something only moderately different (like a pale blue). Yes, I'm talking to you, all you "OPI Bubble Bath is the only color I'll use" women out there who are scared to try anything new. You might be surprised by how much you like seeing something different on yourself. And after all... well c'mon, folks, it's just nail polish. Not a tattoo!

Wednesday, October 7, 2009

French Tip Images

Up until now I've only showed full nail images, but there are a ton of gorgeous french tip images available as well.

These are particularly nice on nails that are just a smidge too long for the full nail images (without double stamping, I mean).

I like to not use the full image, so as to leave the tip image a bit thinner than it's meant to be. That's just a personal preference - I like the look of having longer nail beds and less white to my nail.

(Yeah yeah, I'm going to mention clicking to view the larger image again, although I'm sure you've already figured it out and are sick of me mentioning it. Click for the larger image. There. I said it. Neener.)

Observe. Here's the look I do not like, with the image wider than I feel is attractive:


Photobucket
China Glaze Midnight Ride, China Glaze Harmony, Plate M56

Photobucket
Zoya Emme, Konad Special Polish in Black, Plate CO6 (Coraline Collection)

Photobucket
Essie Pink Parka, Color Club Revvvolution, Plate CO6 (Coraline Collection)

Photobucket
China Glaze Hope Chest, China Glaze Awaken, Plate M73


That was what I do not like. It's very easy to only use part of the image, though, and thus make the tip look smaller and the nail bed look longer:


Photobucket
Essie Lacy Not Racy, Konad Special Polish in Black, Plate M56

Photobucket
China Glaze Spontaneous, Konad Special Polish in Violet Pearl, Plate CO6 (Coraline Collection)


There. I like those manicures much better. The nail bed looks longer, the length looks prettier, and the overall effect is much more tidy.

I put off trying the french tip images for a long time. I was worried I would screw up the alignment and the images would be diagonal on each nail. I was surprised to realize that they are not as difficult to use as I would have thought. By holding my hand up with my palm facing me, and looking at the stamp while I place it on my nail, I can do a fairly decent job of placing the image where I want it on my nail. I'm still not fantastic at getting the alignment perfect, but it's not as noticeable as I thought it would be, and as I practice more I'm sure I'll get better.

Plus, it's fun. :0P

Tuesday, October 6, 2009

The Seche Vite Learning Curve

Since Seche Vite is such a huge part of my manicure routine, I tend to mention it a lot. Seche Vite, however, has a learning curve associated with it.

If not used correctly, nail polish will shrink back from the tip of the nail, like this (click for larger images):

Zoya Dita, China Glaze Awaken, Konad plate M70

Jane Rhythm & Blue, China Glaze Adore, Konad plate M60

Seche Vite has to be used on wet nail polish, but it shrinks nail polish while it dries. Without the use of certain strategies, a careful paint job will wind up ruined.

The trick is to make sure that you're covering the very tip-top edges of your nails when you're painting. You can sort of see what I mean here:

Photobucket
China Glaze Stroll

You might be exclaiming to yourself something along the lines of, "WHAT? A manicure without an image? WHAT IS THIS INSANITY?" And you'd be very right. What can I say, I just didn't feel like it that day. :0P

However, the picture kind of shows that I swiped across the top edge of the nail with nail polish while I was painting. Then when I did my top coat, I swiped that across the top edge as well. That way, if Seche Vite wanted to shrink my polish it wouldn't be able to - it wouldn't have anything to pull back from, since it was "tucked under" at the tip. It's rather like when you're curled up in bed on a cold night, and you're pulling on your blanket to get it closer to your chin. If it's been tucked in well at the foot of the bed it won't budge. If it hasn't, it pulls up easily... and leaves your feet cold.

Anyway, once I started painting the tips of my nails, I started feeling the Seche Vite love. Before that I hadn't been so sure.

The other thing, and I mentioned this yesterday, is that you absolutely cannot use Seche Vite over dry polish. I generally do my imaging a few minutes after doing my base color, so using Seche Vite on top of the image works just fine. However, if I paint my nails and don't wind up doing images until a day or two later, I can't use Seche Vite on top of the design without adding a layer of another base coat first. That way my Seche Vite is still being put on top of wet polish (the other base coat) and won't peel the dry polish off. Usually, though, if I've used another top coat I'll just wait it out until it's dry rather than putting the Seche Vite over it. Heck, if I'm sitting around putting designs on my nails odds are I'm not in a rush to go do anything else!

One last thing: Seche Vite thickens up like the dickens over time. If you're going to be using it, you'll need to buy some nail polish thinner (I actually bought the thinner made by Seche and like it a lot). A few drops here and there keeps the consistency the way it should be.

Yes, Seche Vite is rather a pain. Sometimes you put up with some side-effects because you know a medication will get the job done, and using Seche Vite really isn't much different. One coat of Seche Vite will, in just 5 minutes, dry your manicure enough that you can easily go about your regular tasks without fear of smudging. Within 10-15 minutes you'll be 100% dry. Being able to paint my nails and go to bed shortly after I'm done is a dream come true for me, and completely worth implementing these little strategies. Plus, the shine and wear I get from Seche Vite is unbelievable. Times when I'm busy or simply not as fickle as usual, I can easily get a week or more from my manicure without chipping or much tip wear.

In short, Seche Vite has a learning curve to its use, but my goodness, it sure is worth it in the end.

Monday, October 5, 2009

Using Image Plates

There are a few helpful tips and tricks to doing designs using image plates that I've picked up along the way from other nail polish enthusiasts. Well, they're helpful to me, anyway. Hopefully you'll find them helpful as well.

There's a ton of youtube videos that show how to use image plates, stampers, and scrapers, so I'm not going to bother repeating what's already been shown. Just search for "Konad" and you'll see over 600 results!

With that in mind, I'm going to walk you through my full manicure routine. This is when I'm doing the real deal. Often if I'm just doing a quick polish change a bunch of these steps will be bypassed.

  1. Remove old nail polish, usually using a cotton pad and 100% acetone. The nail polish removers (such as those from Cutex) that are blended with other ingredients work much slower, and I'm impatient and lazy. Plus, if I've used any glitter the Cutex removers are a royal PITA, if you'll pardon my language.
  2. File nails as needed. I use a glass file. I find that other files leave little stragglies hanging off of my nail so I don't have a clean, nice edge after I paint.
  3. Apply cuticle remover, let soak in a minute. I haven't found any one remover that I like best, but I also haven't tried very many. I seem to not be all that picky in this (one) regard. (Lord knows I'm picky enough with almost everything else!)
  4. GENTLY push cuticles back using a rubber-tipped plastic cuticle pusher like this one.
  5. Wash hands with soap. Believe it or not, the soap you choose wash your hands with is crucial. The moisturizing soap I keep in the kitchen leaves too many oils on my skin, so nail polish doesn't adhere to the nail and winds up peeling off within a day. The Bath and Body Works anti-bacterial moisturizing soap I have in my bathroom cleans much better, so my manicure lasts longer.
  6. Get all your supplies ready and within reach. This will include: base coat, base color, design color, top coat(s), nail polish remover, paper towel, cotton pad, image plate, scraper, and stamper. If any of your polishes need thinning (my top coat does regularly), this is a good time to take care of that.
  7. Apply base coat. My favorite is Nailtek Foundation II Ridge-Filling Nail Strengthener. I prefer base coats that are milky looking like this one. I find they protect my nail better and polish adheres better to them than with clear base coats.
  8. Apply base color.
  9. Apply quick-dry top coat. I use Seche Vite, but there's a bit of strategy involved. More on this some other time (probably tomorrow).
  10. Set a kitchen timer for 5-10 minutes. I usually set it to 7.
  11. Get ready to start doing your images. I fold a paper towel in quarters and put it underneath the image plate so that no polish leaks through to the table and the plate doesn't scratch anything. I also douse a cotton pad heavily in nail polish remover and leave it by me so I can easily and quickly clean the plate and the stamp between each image. I clean the scraper a couple times throughout the process, too.
  12. The tutorials show the basic concept of how to transfer the image, but two things I've learned are (1) you don't need to paint polish all over the image. A thick swipe across the top will do it. When you scrape from the top to the bottom of the image, the polish will spread on its own. This helps conserve your polish and keeps your paper towel from becoming a ridiculous mess. (2) Don't lay your hand flat on a table and blindly apply the stamp in a downward motion. Rather, hold up your hand with your palm facing you, and apply the stamp to your nail while you're looking at the image on the stamp so you can see how it's aligned.
  13. Once all ten fingers are done, do a final quick clean of the plate and the stamper.
  14. Here's the last trick I've picked up. If you're using Seche Vite as your top coat, only use it to seal in the image if you're doing your images shortly after doing your base color. Otherwise you're using Seche Vite over dry polish, which causes it to peel. If you're doing your designs a few hours or a day or two after doing your base color, don't use Seche Vite. I reach for Sally Hansen No Chip in this case. You can, if you want, apply Seche Vite on top of the other base coat. The point is just that you can't use Seche Vite on dry polish.
  15. While waiting for the top coat to dry (usually I set a timer for about 10 minutes if I've used Seche Vite, or 20 minutes if a regular top coat), grab that cotton pad that you were using to clean the image plate. Fold it in quarters and use the corner and edges to clean off the polish from the image plate that's gotten all over the skin around your nail. Careful not to get too close to the nail, though - you don't want to ruin your manicure!
I know that seems like a lot, but truly, usually when I do a manicure I'm done in about 30-45 minutes, including dry time. And the results make me smile for days whenever I look at my hands!


Zoya Dita, China Glaze Awaken, Konad plate M70
Zoya Dita with China Glaze Awaken, Konad plate M70

Sunday, October 4, 2009

Polishes to use for images

Here is my first ever manicure with a full nail design. This continues the thought from yesterday about nail length - as you can see, my nails were much shorter then, but the design still worked fine. (Click for larger image)


China Glaze Awaken with China Glaze Agent Lavender, Konad M70 China Glaze Awaken with China Glaze Agent Lavender, Konad M70

That was done with China Glaze Awaken and China Glaze Agent Lavender, using konad plate M70. It doesn't look completely terrible, but if I'd known then what I know now, I would have reversed the colors and used Awaken for the image. Agent Lavender simply isn't opaque enough to work for this look.

Some polishes just work better than others for images. The edges are more crisp and the design more professional looking.

Sometimes, though, what you want is a more subtle, less opaque design, as I did with this look (click for larger image):


misa,A Sin Worth Committing,china glaze,Secret Periwinkle,konad,M63

That's Misa A Sin Worth Committing with China Glaze Secret Periwinkle, using plate M63. While generally I wouldn't use Secret Periwinkle for a design, in this case I think it worked. I didn't want to distract from the beauty of the Misa polish, but I had the konad urge, and when that urge hits there's really no denying it.

I had toyed with the idea of using a different polish for the design - as usual, one of the ones from the China Glaze Romantique collection. I even went so far as to swatch it before doing a full manicure:


zoya,dierdre,china glaze,Joy,konad,M70,Misa,A Sin Worth Committing,Awaken,Secret Periwinkle,M63
L-R:
Zoya Dierdre, China Glaze Joy, Konad M70
Misa A Sin Worth Committing, China Glaze Awaken, Konad M63
Misa ASWC, China Glaze Secret Periwinkle, Konad M63


As you can see, the image comes out much better with China Glaze Awaken than with Secret Periwinkle. However, with Secret Periwinkle you pay more attention to how pretty the base color is, and that's what I had wanted that day.

Sasse has put together a lovely list of polishes that work well with image plates. For the most part, though, I just enjoy playing around with what I already have. I'll try it on a finger or two before removing my previous mani, and if I like it I'll try it. Worst comes to worst I'll wind up not liking it and I'll have an excuse to change my mani again. ;0)

Saturday, October 3, 2009

Konad images and nail length

My first question when I wanted to start using konad image plates was whether my nails were too short for them to work.

In a word, no way. No way in heck.

Here is one of my first konad attempts (click for larger image... in fact, you can't really see this one unless you view it larger):


cover girl,midnight magic,china glaze,awaken,konad,m64
Cover Girl Midnight Magic, China Glaze Awaken, Plate M64


As you can see, my nails were pretty short back then. That works out fine, though; the full nail image plates are made for rather short nails. In fact, if I'm not careful about keeping my nails filed down, I'll wind up with gaps at the cuticle where there is no image.

Observe (click for larger image):


Zoya,Harley,Color Club,Revvvolution,M72
Zoya Harley, Color Club Revvvolution, konad plate M72

These nails are just on the verge of being too long to easily use a full nail image, and in my mind, those aren't very long nails.

Some people prefer to have nails that are longer than that, and will "double stamp" the image so the whole nail is covered. Sometimes it works, but sometimes the border between the two stamps will overlap or have a gap. It's definitely an alignment challenge. Since I prefer to have my nails shorter anyway, it's a non-issue for me. If longer nails are your thing and you want to see some examples of double-stamping, check out The Nailphile. For examples of images on shorter nails than mine, check out Sasse's Stamping Stampede.

Friday, October 2, 2009

A More Delicate Konad

Today I'd like to show you a more delicate design, since yesterday's had a bit of a bass-add edge to it.

This one was done with China Glaze Recycle, China Glaze Cherish, and konad plate M64. As usual, click the thumbnail for a larger view.


China Glaze,Recycle,Cherish,Konad,M64

China Glaze Cherish is part of the China Glaze Romantique collection. Every single polish in this collection is amazing to do konad designs with. They have a metallic finish, which I don't usually love for a full mani, but I love the way the light shines off of the nail when I do a metallic design over a cream polish.

I bought the China Glaze Romantique collection from www.transdesign.com, but I'm sure it can be found elsewhere. Transdesign just happens to be my retailer of choice; I like their prices and how quickly they ship.

Thursday, October 1, 2009

Oh what to do...

Okay, so, I have a problem.

As you've probably noticed, my interest in plants has waned somewhat. I still love them, still care for them, but picture taking and posting about them seems to have fallen by the wayside.

My interests, they hath moved on.

So what next? Well, I've kind of become addicted to nail polish. Well, not just nail polish, actually. Specifically, I've become addicted to somewhat unusual colors of nail polish and to stamping images on my nails using konad plates and stamps. (For more info on konad, go here).

I've been having fun with different nail polish looks since early spring and have dozens of photos of different manicures that I'm proud of. And I have a blog set up that I don't use. So rather than forcing myself to stick to the topic of plant care, I'm going to go easy on myself and allow the use of this blog to branch into whatever I feel like writing about. For now, that's going to be nail polish. Lord knows what interest will strike me next.

With that in mind, I would like to show off my favorite manicure that I've done. This isn't proving to be easy. I'm looking through all of my photos and there are so many that I love that choosing just one is nearly impossible. But in the interest of posting a teaser so that you'll come back and read future posts, here's the one I'm going to settle on for now (click to view larger image):

 
China Glaze,Cords,Konad,Black,Special Polish,M63


That's China Glaze Cords with konad special polish over it, using konad plate M63 (one of my favorites).

I find this image to be pretty forgiving. If the alignment is a little crooked, it's unlikely to be noticeably so. This isn't the case with many other full-nail images, which is probably why I like this one so much. I have serious alignment issues!

That's all for today... stay tuned for future manicured fun.


Tuesday, May 26, 2009

Kitties like gardening, too

Oliver made an escape onto the balcony this morning while I was putting the tomato plants outside (I'm in the process of hardening them off). I picked him up and carried him around the balcony, and showed him all the little plants I'm growing and all the little buggies. He snuggled up into my chest and listened intently to every explanation. I think he really loved it... maybe a little too much, in fact. When I opened the screen door to go back inside he stuck his claws in it so I couldn't get it open without dislodging him first. Then he hooked his claws into my shirt so that I couldn't put him down. He wanted to stay outside!

Can't say I blame him... I rather felt the same way having to come to work today. ;0)

Here's a picture of Oliver that I took in April of 2008. He's quite a bit bigger now. But this is his typical behavior whenever I'm out on the balcony. He's saying, "Please momma! Let me come play too!"
Oliver 4-3-08

Monday, May 18, 2009

We gots melons!

The Plum Grannies sprouted while I was at work today! One variety down, two more to go...

Saturday, May 16, 2009

Oh yes, veggies will be mine...

First things first: I would really like to know why I always have the best hair days on days when I couldn't care less how I look. Seriously, what exactly is the deal there? I purposefully set aside a day for myself just for puttering around my house, and my hair looks better than it has in weeks. Sigh.

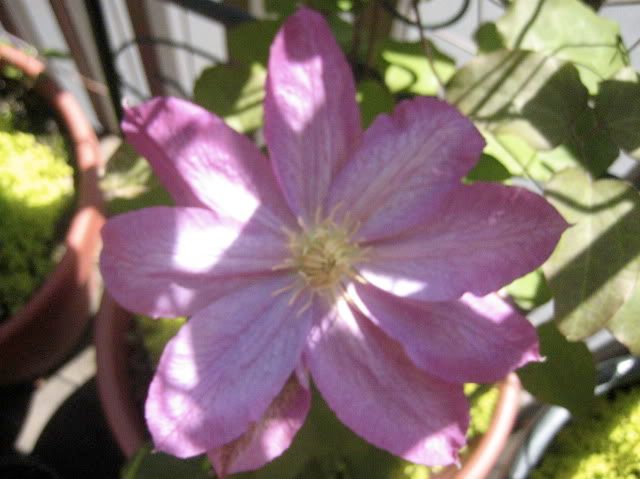
Okay, on to the plants. First up is Clematis Asao, because folks, we've got us some blooms. That's right, the first flowers of summer 2009 have arrived. There's only four flowers, and they're all on one plant, but I'm sure the other plants will catch up eventually.

Here's the only bloom that was easy to take a picture of:
Clematis Asao #1

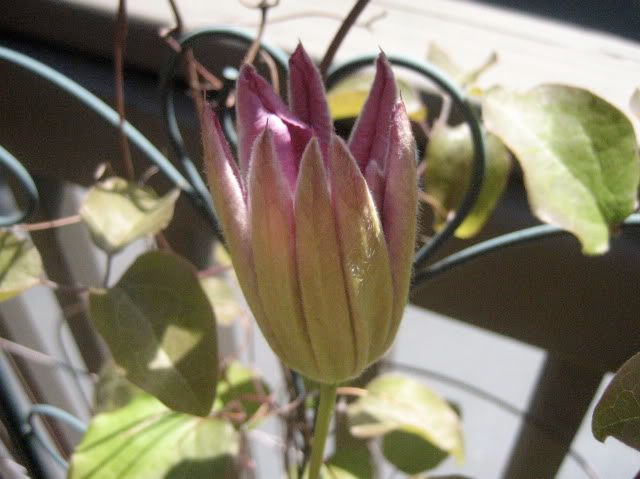
This guy needs another day or two before he really gets photo-worthy:
Clematis Asao #1

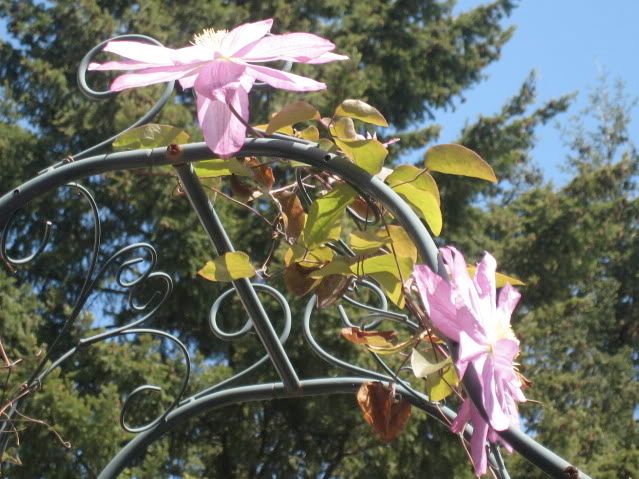
And these guys are 8 feet in the air, so there's no way I was going to be able to get a good shot of them! They look nice against that clear blue sky, though, don't they?
Clematis Asao #1

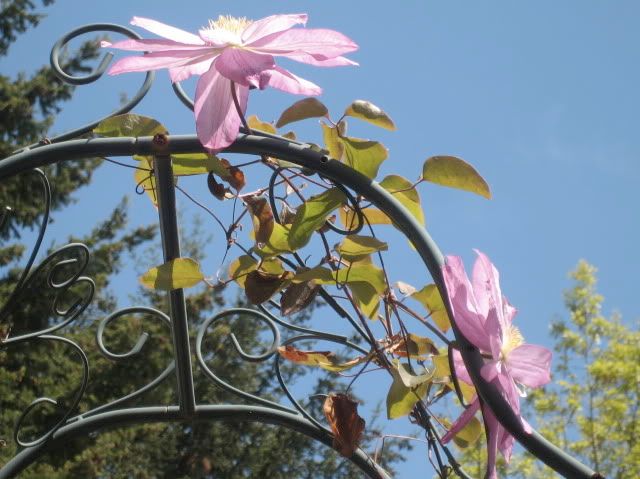
I tried leaning way out over my balcony railing and holding my camera up over my head, but the results of my efforts weren't much different than the lazy shot just above this one.
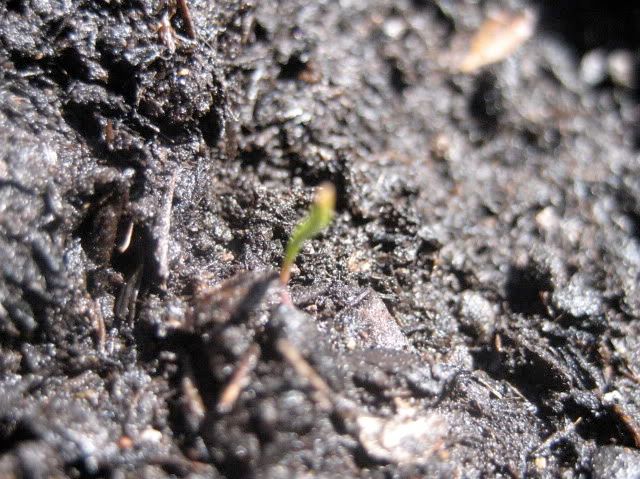
Clematis Asao #1

And now the veggies...

Little Fingers Carrots
This tiny little green squiggle is apparently going to be a carrot someday. This is what I'm told, anyway. Funny thing is, he almost met an untimely demise. Initially I thought he was just another one of the many pesky weeds I've been dealing with on a daily basis. Fortunately I decided not to pull him, because within an hour or two he had a buddy.
First carrots, 05-16-09

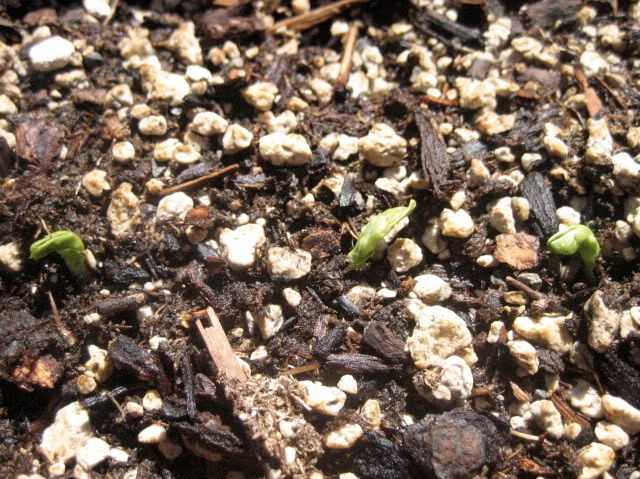
That's right - these little guys are actually growing so fast that you can literally watch them grow. In the couple of hours I spent outside today, three more popped out of the dirt (I'd already put my camera away and was too lazy and dirty by then to come back in and get it). And since they're all in a nice, neat row, exactly how I planted the seeds, I think it's safe to say they aren't weeds.
First carrots, 05-16-09

Oregon Sugar Pod Peas
Here is the box I planted peas in.
Peas 05-16-09

This is my first time growing veggies, and I don't know a thing about how peas grow. I didn't expect them to look so much like fully-formed pea pods right out of the ground like this, that's for sure. I think I expected them to be like other veggies, with a flower that develops into a fruit. I'm such a city girl. I'm also realizing that I haven't a clue how peas are harvested. Fortunately, my friend Kristi loves growing peas, and I'm fairly sure she won't laugh at me when I ask her what I'm supposed to do!
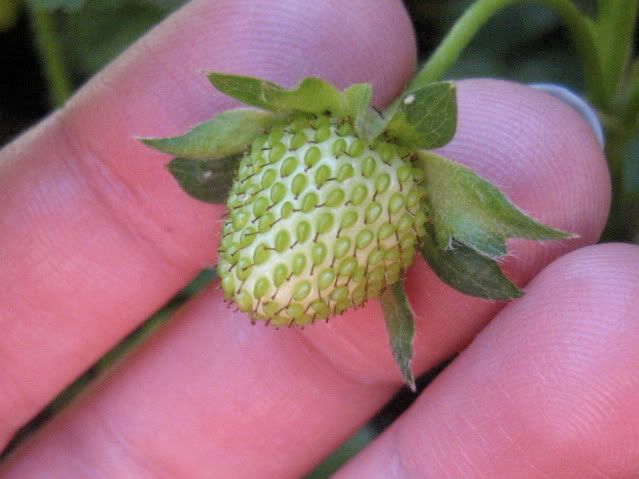
First peas, 05-16-09

Strawberries
For the sake of comparison, I want to re-post the picture of the strawberry pot that I posted on April 22:


Not terribly impressive compared to that same pot today:
Strawberry pot 05-16-09

I'm gonna have me a TON of berries! Yeah!
1st strawberry, 05-16-09

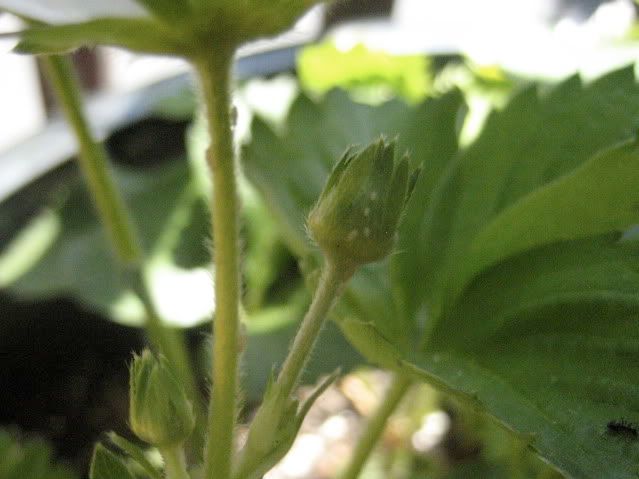
However, with the nicer weather it seems I've obtained some unwelcome guests. They wore out their welcome last year, doing a ton of damage to the nasturtium I'd planted. You can see a couple of them on the leaf above, and they're a clear presence in the photo below. That's right, folks... I'm talking about aphids.
Aphids on strawberries, 05-16-09

For those of you that don't know what aphids are, they're a common garden pest that slowly drink all the moisture out of a plant, leaving you with a wilted, then dry, then dead mess. Wasp and ladybug larvae will eat them, so people with bigger growing areas will often plant things that wasps and ladybugs are known to be attracted to (see this forum post for more info on this).

(This is the kind of stuff you pick up when you've dated an entomologist, by the way. My bug knowledge has far surpassed anything I ever imagined.)

I, however, don't have the space for strategic planting, although I'm definitely starting to reevaluate that stance after last year's loss. Losing the beauty of the nasturtium I'd carefully grown from seed was irritating, but losing berries and veggies I'd been looking forward to eating would break my heart. And what's a little more crowding on my already over-crowded balcony?

(Another side note: I've started seeing my balcony as the eyesore yard of the neighborhood. My crazy compilation of pots compared with my neighbors' nice, tidy, adorable little balconies reminds me of an overgrown front yard with a car on blocks smack in the middle. Yeah. I'm *that* neighbor.)

Anyway, for right now I'm attacking the aphids the old fashioned way - with a spray bottle full of soapy water. It keeps them in check so long as I get out there at least once every 2-3 days to give them another douse. I really don't want to spend my whole summer that way, though.

We'll have to see... sometimes the beneficial insects will show up on their own, without any encouragement. If I get irritated enough, I'll go buy some sweet alyssum or cilantro or something of the like.

That's all I have for pictures for now, I'm afraid. None of the melons have done a thing yet, and while there are some signs of life in the jiffy pots in my office I haven't taken any pics. My tomato starts that I have at home are still sad little things, and I'm not sure what's going to come of them. A new friend has offered me some hot pepper starts, which would be fun to grow with the tomatoes and tomatillos that I'm hoping to make salsa with.

One last thing, because my mother will appreciate that I'm thinking of her. My mom and stepfather will be out here to visit in about three weeks. I really wanted my mom to see my clematis in bloom. As of right now they haven't set buds yet, so I'm thinking it isn't going to happen... not unless we get three weeks of ridiculously nice weather, and odds are slim that Oregon's weather will cooperate that way! Oh well... hopefully the African Violets will look nice for her.

Christmas Day

Okay, I know. I'm terrible. I haven't posted in forever. I have a good excuse, though - it's impossible to take pictures of my m...